|
The trial of the Embossing powders continues! I have taken some photos of fall foilage with an emphasis on backlighting that I think will work well with the metallic highlights I want. I'll post those photos soon.
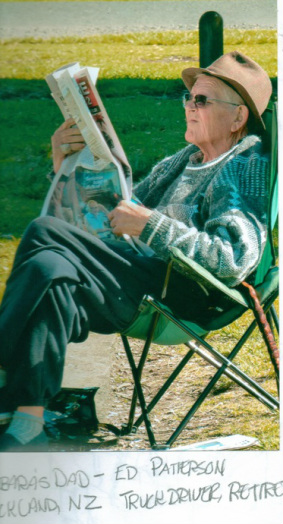
Today, I am working on a new commission for a lady in New Zealand. She sent a photo of her father, who is retired. I am going to photograph the entire process I use and post it here, with the purpose of demonstrating how to get a good portrait from a photo. Below is the beginning photo, and I will walk you through my process as the portrait evolves! The first thing will be to determine the content of the final painting. I don't want to just copy the whole photo, although I do like the "stripes" of sunlight in the background. They add interest and energy to the background. For a portrait, I want to establish a "personal" connection between the subject and the viewer, so I will bring it in to make the expression on his face become the center of interest. I use a small "view finder made from an index card, and move it around sections of my photo to get the composition. TO BE Continued......... :)
1 Comment
I discovered Embossing Powder when I was working on my daughter's wedding invitations this past Summer. We used a rubber stamp of a tree as the theme. Turns out, when the ink is wet, this fabulous powder will adhere to the design, and when heated, bubble up into a nice texture. (I especially like the metallics) Embossing powders come in a variety of colors, are inexpensive, and can be found easily in the Stamping or Scrapbooking isle of your local craft store. (Don't forget your coupon!) Of course, you will understand that the creative part of my brain frowned at using a "rubber stamp", but I still wanted to use this in my artwork in some way. Sooo... During my trial and error, I discovered that a little diluted Gum Arabic and a liner brush work best for "drawing" your design. The gel glue I used in the painting below was difficult to get small enough Work in small sections with the gum, and sprinkle the powder liberally on the area. then tip it up and tap off the excess. The powder will only stick to the wet parts. I use the lid to an old box lined with a sheet of typing paper to catch the extra, and put it back in the bottle by making a funnel with the paper. A little goes a long way! There is a heat gun that is like a small hairdryer to melt the powder to the paper. Then you can proceed to paint as loosely as you wish, because your highlights are saved. I am thinking it may also work on a finished painting to "pull out" a highlight, so I'll have to let you know on that one. :) Right now, I am working with embossing powder to enhance my landscape watercolors. I haven't had much success with watercolor landscapes, mainly because I want to overpaint them. I am fascinated with the metallic highlights I can make, so we'll see how it goes!
Just to keep updated with the landscape progress... This morning I tried loading my brush with juicy paint and tapping it over the area I want to look like grass in the foreground. It came out pretty cool- I love the way the colors mix and "travel"! The only down side is that when I went to get dressed for work, I had Phalo Blue speckles all over my face and arms!
I'm going to attempt to keep this current with what I am currently working on, although it makes sense that if I am spending time on the computer, I am neglecting my projects elsewhere! I guess I will use the Covey approach, and schedule time each week to update. That will also help me to keep track of my own progress when I look back over the week's projects.
|
AuthorI think it is important to share our process with others, just as we gain from watching other artists work. Archives
June 2024
Categories |

 RSS Feed